Permission-Based Access Control with Guards
Once user authentication and signed JWT issuance are established, the next architectural challenge is governing what resources and actions each authenticated user is permitted to execute across system endpoints.
In this concluding guide, we implement a granular Permission-Based Access Control (PBAC) model. We construct a custom @Permissions decorator, an authorization PermissionsGuard utilizing NestJS's Reflector, and declarative controller protection.
1. Transitioning from Roles to Granular Permissions (RBAC vs. PBAC)
In early application prototypes, developers often bind rigid role names directly to route decorators (e.g., @Roles('admin')). However, this tight coupling introduces notable problems as systems scale:
- Role Explosion: When an "editor" user needs permissions to delete user comments but not articles, teams are tempted to create bespoke roles like "editor_with_comment_deletion".
- Rigid Coupling: Route handlers become tightly coupled to specific business role titles, preventing administrators from dynamically adjusting role privileges through a management dashboard.
The Solution: Permission-Based Access Control (PBAC)
- Routes and Controllers declare exclusively the atomic permission required for execution (e.g.,
users:read,users:create,products:delete). - Roles group arbitrary sets of granular permissions inside the database.
- Users are assigned one or more roles.
2. Creating the @Permissions Decorator
NestJS allows developers to attach custom metadata to controllers and route handlers using the SetMetadata helper provided by @nestjs/common.
Create the decorator in your authentication or authorization module:
import { SetMetadata } from '@nestjs/common';

/**
 * Constant metadata key used for storing and reflecting route permissions.
 */
export const PERMISSIONS_KEY = 'permissions';

/**
 * Custom decorator binding required atomic permissions to an endpoint handler.
 * Example: @Permissions('users:read', 'users:delete')
 */
export const Permissions = (...permissions: string[]) =>
  SetMetadata(PERMISSIONS_KEY, permissions);
Runtime Mechanics
When TypeScript compiles this decorator, it registers an entry in the reflection metadata registry (Reflect) associated with the controller method. The decorator does not execute authorization checks itself; it merely annotates route handlers with policy requirements.
3. Implementing PermissionsGuard
PermissionsGuard implements CanActivate and utilizes the NestJS Reflector utility to inspect metadata bound by @Permissions.
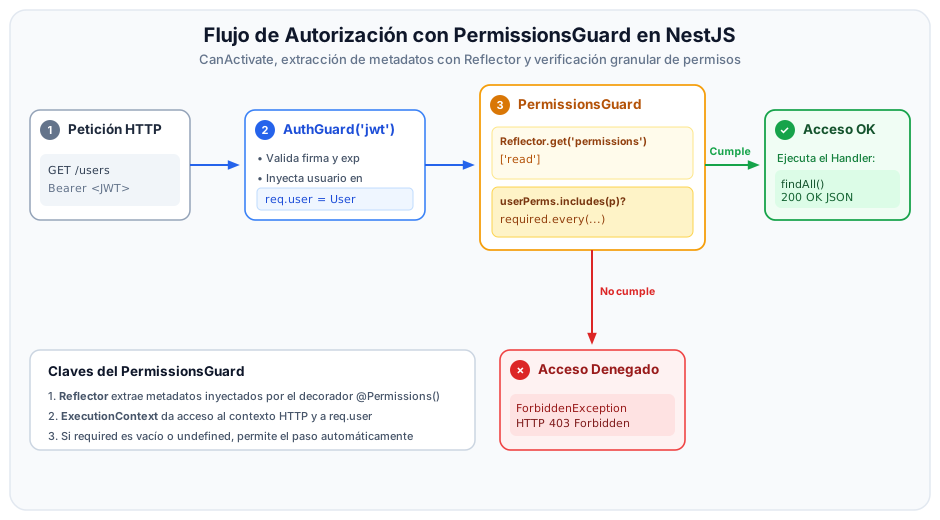
Guard Implementation
import {
  Injectable,
  CanActivate,
  ExecutionContext,
  ForbiddenException,
  UnauthorizedException,
} from '@nestjs/common';
import { Reflector } from '@nestjs/core';
import { Request } from 'express';
import { PERMISSIONS_KEY } from '../decorators/permissions.decorator';
import { User } from '../../users/entities/user.entity';

/**
 * Express Request interface extension typing the authenticated user entity.
 */
interface AuthenticatedRequest extends Request {
  user?: User;
}

@Injectable()
export class PermissionsGuard implements CanActivate {
  constructor(private readonly reflector: Reflector) {}

  canActivate(context: ExecutionContext): boolean {
    // 1. Extract required permissions from the target handler method
    const requiredPermissions = this.reflector.get<string[]>(
      PERMISSIONS_KEY,
      context.getHandler(),
    );

    // If the route has no @Permissions decorator, access is granted (or governed solely by AuthGuard)
    if (!requiredPermissions || requiredPermissions.length === 0) {
      return true;
    }

    // 2. Obtain underlying HTTP Request object
    const request = context.switchToHttp().getRequest<AuthenticatedRequest>();
    const user = request.user;

    // If req.user is undefined, AuthGuard did not run or the token was invalid
    if (!user) {
      throw new UnauthorizedException('Unauthenticated user in request context');
    }

    // 3. Extract the flat list of permission strings from the user's role
    const userPermissions =
      user.role?.rolePermissions?.map((rp) => rp.permission.name) ?? [];

    // 4. Verify that the user possesses ALL required permissions (AND condition)
    const hasAllRequiredPermissions = requiredPermissions.every((permission) =>
      userPermissions.includes(permission),
    );

    // 5. If missing any required permission, block access
    if (!hasAllRequiredPermissions) {
      throw new ForbiddenException(
        'Access denied: You do not have sufficient permissions to perform this action',
      );
    }

    return true;
  }
}
In this design, we employ requiredPermissions.every(...), requiring that the user holds all specified permissions. If your domain requirements dictate that satisfying at least one permission suffices, replace it with requiredPermissions.some(...).
4. Applying Guards to Controllers
To guard an endpoint, chain guards sequentially using the @UseGuards() decorator.
import {
  Controller,
  Get,
  Post,
  Delete,
  Body,
  Param,
  UseGuards,
  HttpCode,
  HttpStatus,
  Query,
} from '@nestjs/common';
import { AuthGuard } from '@nestjs/passport';
import { UsersService } from './users.service';
import { CreateUserDto } from './dto/create-user.dto';
import { Permissions } from '../auth/decorators/permissions.decorator';
import { PermissionsGuard } from '../auth/guards/permissions.guard';

@Controller('users')
// Applied sequentially to all route handlers inside this controller
@UseGuards(AuthGuard('jwt'), PermissionsGuard)
export class UsersController {
  constructor(private readonly usersService: UsersService) {}

  @Get()
  @HttpCode(HttpStatus.OK)
  @Permissions('users:read')
  async findAll(@Query('username') username?: string) {
    return this.usersService.findAll(username);
  }

  @Post()
  @HttpCode(HttpStatus.CREATED)
  @Permissions('users:create')
  async create(@Body() createUserDto: CreateUserDto) {
    return this.usersService.create(createUserDto);
  }

  @Delete(':id')
  @HttpCode(HttpStatus.NO_CONTENT)
  @Permissions('users:delete')
  async remove(@Param('id') id: string) {
    return this.usersService.remove(+id);
  }
}
The sequence of guards supplied to @UseGuards(AuthGuard('jwt'), PermissionsGuard) is strictly linear:
AuthGuard('jwt')runs first: it validates the incoming Bearer token and attaches the user entity toreq.user.PermissionsGuardruns second: it readsreq.userto inspect authorities. If you invert this order,PermissionsGuardwill always throw an unauthenticated user exception.
5. Verification and Response Diagnostics
Test authorization rules using tools such as cURL, Postman, or Insomnia.
Scenario 1: Access Granted (Valid Token + Required Permission)
curl -X GET http://localhost:3000/users \
  -H "Authorization: Bearer eyJhbGciOiJIUzI1NiIsIn..."
HTTP 200 OK Response:
[
  { "id": 1, "email": "ana@icesi.edu.co", "role": { "name": "admin" } }
]
Scenario 2: Unauthenticated Request (Missing or Expired Token)
curl -X GET http://localhost:3000/users
HTTP 401 Unauthorized Response:
{
  "message": "Unauthorized",
  "statusCode": 401
}
Scenario 3: Access Denied (Valid Token, Insufficient Permissions)
When an authenticated user with role "guest" attempts to access an endpoint requiring users:read:
HTTP 403 Forbidden Response:
{
  "message": "Access denied: You do not have sufficient permissions to perform this action",
  "error": "Forbidden",
  "statusCode": 403
}
Troubleshooting: Resolving HTTP 500 Errors
If your protected routes emit unexpected HTTP 500 Internal Server Error responses during permission checks, the most common root cause is that user.role or user.role.rolePermissions is undefined when mapped by the guard.
Ensure that the query executed inside JwtStrategy.validate(payload) or UsersService.findById() explicitly loads relational joins:
async findById(id: number): Promise<User | null> {
  return this.userRepository.findOne({
    where: { id },
    relations: [
      'role',
      'role.rolePermissions',
      'role.rolePermissions.permission',
    ],
  });
}